
This article describes how to use the Waiting Room screen to display a list of patients who have arrived at one or more practice locations and are waiting to be seen.
In this article:
Access the Waiting Room
The Waiting Room screen can be accessed in the following ways:
- From the Main Screen, select View > Waiting Room or press CTRL + F12
- From the Main Screen, select the Open Waiting Room icon
- From the Appointment Book screen, select View > Waiting Room or press F12
- From the Appointment Book screen, select the Open Waiting Room icon
Waiting Room Basics
Patients appear in the Waiting Room when their appointment is marked as 'Arrived' on the Appointment Book screen.
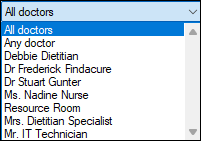
A drop-down box at the top of the screen lists all users who are set up to have appointments. It can show all patients waiting for a specific doctor, or display all patients currently in the waiting room by selecting the All Doctors item in the list.
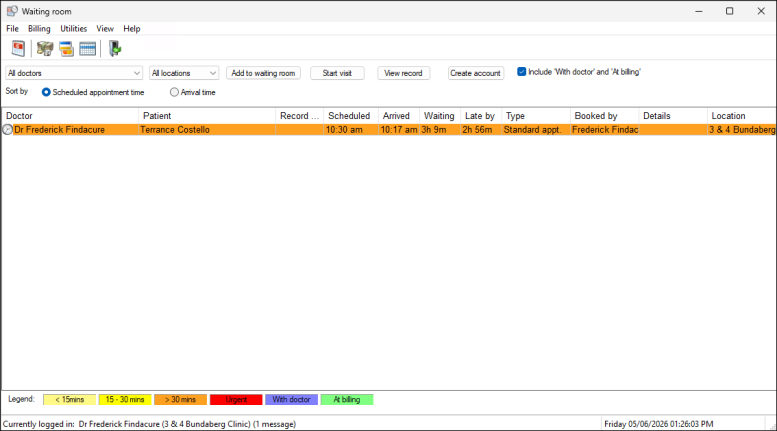
The columns located in the main area of the Waiting Room display the following information:
|
Column Heading |
Column Details |
|
Patient |
The name of the patient marked as ‘Arrived’ in the Appointment Book. |
|
Record No. |
A system-generated number allocated to each patient on creation. This number can be used as a search parameter when interrogating the database. |
|
Scheduled |
Displays the time at which the patient's appointment is scheduled in the Appointment Book. |
|
Arrived |
Displays the time at which the patient was marked as ‘Arrived’ in the Appointment Book. |
|
Waiting |
Displays the total length of time a patient has been waiting. This is calculated based on the actual time a patient is marked as ‘Arrived’ in the Appointment Book. |
|
Late by |
Displays the amount of time a patient has been waiting past their scheduled appointment time. |
|
Type |
Displays the patient's appointment type as recorded when the appointment was created. |
|
Booked by |
Displays the name of the user who created the appointment in the Appointment Book. |
|
Details |
Displays any notes entered into the ‘Details’ text box when the appointment was booked. |
|
Location |
Is only visible where a practice has set up multiple clinics in a shared Bp Premier database. This column displays the clinic location where the appointment was booked. |
Appointment Status
|
Legend Heading |
Legend Details |
|
|
Patient wait times are displayed in shades of yellow and orange. When the patient is marked as ‘Arrived’ in the Appointment Book, the wait timer starts, and the time the patient has been in the waiting room increases, with the entry colour deepening. |
|
|
Displays when the patient is flagged as ‘Urgent’ during the patient arrival process in the Appointment Book. |
|
|
Changes the patient's record status to ‘With doctor’ when the clinician starts the visit. |
|
|
Indicates the consultation is complete and the patient is now ready for the billing process to commence. |



Common Management Tasks
Common management tasks can be performed from the Waiting Room using these features:
|
Icon |
Icon Name |
Feature Description |
Shortcuts |
|
|
Open Appointment Book |
Will open the ‘Appointment Book’ at today’s date. This function can also be performed by selecting View > Appointment Book |
F12 |
|
|
Create Account |
Generates an account for the currently selected patient. If the clinician has finalised the patient’s visit, then the ‘Account details’ screen will be displayed, and the account can be created and completed. If the patient’s visit has not been finalised, then the ‘Add account item’ screen will be displayed. NOTE: The account cannot be completed until the visit is finalised. See Create an account from an appointment for more information. This function is also accessible by selecting Billing > Create Account |
CTRL + F3 |
|
|
Process Payment |
Opens the ‘Select Account holder’ screen. Users can select a patient to complete a payment. See Process a Payment for more information. This function is also accessible by selecting Billing > Process Payment |
CTRL + F5 |
|
|
Account History |
Opens the ‘Account History’ screen for the currently selected patient and allows a user to view the patient's past and current accounts. See Using the Patient Billing History for more information. This function is also accessible by selecting Billing > Account history |
CTRL + F6 |


Additional Common Tasks
Additional common tasks can be performed from the Waiting Room using these buttons:
|
Button Name |
Button Function |
Shortcuts |
|
|
This button is only visible if the option ‘Allow patients to be added directly to the Waiting Room’ is enabled in Setup > Configuration > Appointments. With this function enabled, users can add patients directly to the Waiting Room without first adding them to the Appointment Book. When added to the Waiting Room, patients are visible in the Appointments window for the nearest timeslot to when they were added. This ensures the patient is visible for billing after the visit is finalised. This function can also be performed by selecting File > Add to Waiting room |
F3 |
|
|
Opens the patient record and begins the consultation timer. The appointment status changes to ‘With doctor’, and a visit record is created in the database. If the ‘Include With doctor and At Billing’ checkbox is inactive, the patient’s name will be removed from the waiting room screen. NOTE: A visit can only be started if the patient’s appointment is booked with the user who is currently logged into the waiting room. This function can also be performed by selecting File > Start visit, or by right-clicking the patient name and selecting ‘Start visit’. |
F2 |
|
|
Opens the patient record without starting the consultation timer. No visit is created in the database, and the patient’s name is not removed from the waiting room. This function allows patient notes to be previewed before the patient is seen and the consultation commences. This function can also be performed by selecting File > View record, or by right-clicking the patient name and selecting ‘View notes’. |
F4 |
|
|
Generates an account for the currently selected patient. A warning is displayed if the patient has not been marked as having been seen by a clinician. This function can also be performed by selecting Billing > Create Account, or by right-clicking the patient name and selecting ‘Create account’. |
CTRL + F3 |
|
|
If the ‘Include ‘With doctor’ and ‘At billing’ checkbox is ticked, then patients marked as ‘With doctor’ or ‘At billing’ will remain in the list until the entire patient workflow is completed. If the checkbox is unchecked, only patients still waiting will be displayed in the list. When the clinician starts the visit, their record status will change to ‘With doctor’ and be removed from the list when the screen automatically updates. |
|




NOTE The checkbox options can be found by navigating to Setup > Configuration > Appointments and checking ‘Show uncompleted appointments in Waiting room when opened’.The Waiting room screen is automatically updated every 60 seconds to reflect changes in appointment status and arrivals.
The sorting sequence of the columns in the Waiting Room can be changed by selecting one of the available options:
- Scheduled appointment time – Displays the patients marked as arrived in the order of their appointment time.
- Arrival time – Displays patients by the time they were marked as arrived, not by their scheduled appointment time.
Other Waiting Room Functions
Double-clicking the patient name in the waiting room list performs different actions depending on the patient’s appointment status.
- If marked as ‘Arrived’, double-clicking performs the same action as pressing the ‘Start visit’ button and opens the patient’s record, starting the consultation timer.
- If marked as ‘With doctor’, double-clicking will do nothing as the patient record is already open.
- If marked as 'At billing’, the ‘Create account’ screen will open, listing any items identified by the clinician during the ‘Finalise visit’ process.
|
Function Name |
Function Details |
|
Changing a patient's appointment |
Patient appointment details can be altered by right-clicking the patient name and selecting ‘Edit appointment details’. This will open the ‘Appointment details’ screen. See Book or update an appointment for more information. |
|
Removing Patients |
Patients' names can be removed from the Waiting Room by highlighting a patient, then selecting File > Remove, or by right-clicking the patient name and selecting ‘Remove’. This only removes the patient's name from the Waiting Room; they will still be visible in the Appointment Book. |
|
Messages |
Select Utilities > Messages or press F8 to open the Messages window. See Send internal messages for more information. |
|
Daily Message |
Select Utilities > Daily Message to open the Daily Message screen. See Set a daily message for more information. |
|
To do List |
The To do List is a personal reminder system for each Bp user. Select Utilities > To do List or press F6. See Using the To Do list for more information. |
|
Contacts |
The contact list contains information about individuals, companies, or institutions with whom the practice has dealings. Open the Contacts screen by selecting View > Contacts or pressing F11. See Add, edit or merge contacts for more information. |
Last updated: 06 July 2026.



 AU
AU 