
This article explains how to set up and configure Assignment of Benefit settings in Bp Premier.
IMPORTANT On the 18th of June it was announced that the Government has revised the Assignment of Benefit transition timeline. Please read this article for more information.
NOTE To configure practice level AoB settings in Bp Premier, users must have the Setup/Configuration permission set to Add/Edit/Delete.
In this article:
Before you begin
The following prerequisites must be met before any digital consent requests can be generated or processed.
Practices must ensure their server is running a supported version of Windows and that they have reliable internet connectivity. Network settings must allow secure communication with Bp Premier’s cloud services, including ensuring that firewalls or DNS configurations do not block required endpoints.
See System Requirements for further details.
Only users with administrative permissions can configure AoB settings in Setup > Configuration. If a background connectivity failure occurs, Bp Premier sends an internal message to senior staff, specifically Practice Manager and Principal Doctor users, to indicate that action is required.
See User Permissions for further details.
Before a practice can send digital AoB requests via SMS in Bp Premier Oxford, the practice must be registered for Bp Comms and have sufficient Bp Comms credits. The practice should also consider completing the SMS Sender ID registration that comes into effect on 1 July 2026.
- Bp Comms registration and credits: Practices intending to send digital AoB requests via SMS in Bp Premier must be registered for Bp Comms and have enough Bp Comms credits available. Digital AoB SMS messages are charged at the default rate of 4 cents ($0.04) per SMS. Reach out to our Bp Sales team to discuss options for a Bp Comms pack that suits your needs.
- Sender ID (Alpha Tag) registration: Practices using or planning to use Bp Comms for digital SMS AoB should strongly consider completing SMS Sender ID registration so patients can clearly recognise the sender. See Bp Comms Alpha Tag Changes 1 July 2026 for further details.
NOTE Practices planning to use paper AoB forms or manage AoB externally are not required to register for Bp Comms, purchase SMS credit packs, or complete the Sender ID registration process with Best Practice Software.
IMPORTANT When editing templates, practices should monitor the character count for each template type. Increasing the message length to extend beyond the SMS character limit for a single SMS will result in multiple messages sent and credits used, increasing the cost of each request sent.
Enable Assignment of Benefit
To enable assignment of benefit for your practice, follow the steps outlined below:
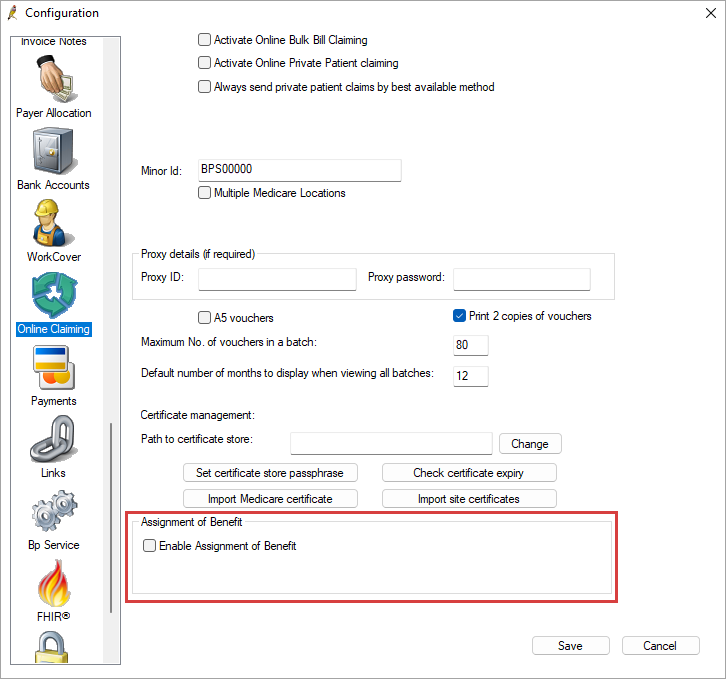
- Go to Setup > Configuration > Online Claiming.
- Select the Enable Assignment of Benefit checkbox.
- Click OK to confirm that you want to enable this functionality at your practice.
- Restart Bp Premier.
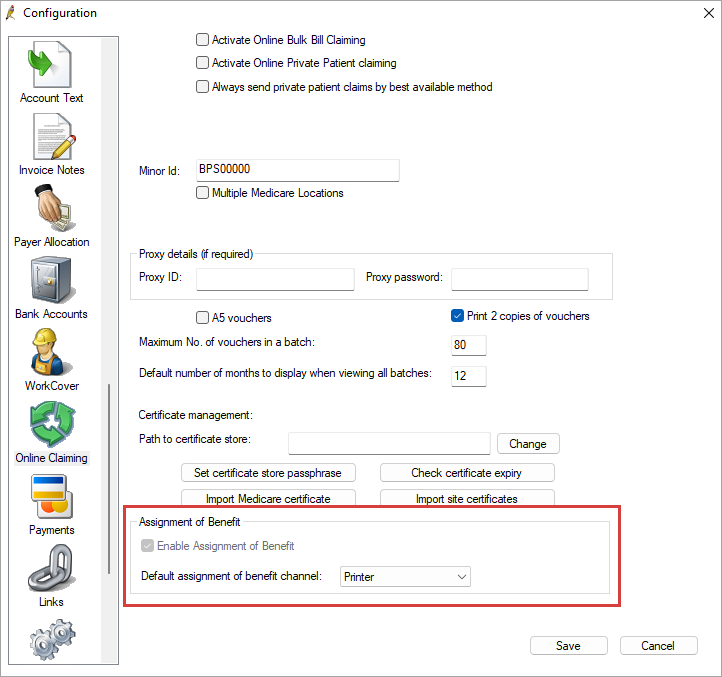
- In the Online Claiming tab the Enable Assignment of Benefit checkbox will be selected and greyed out.
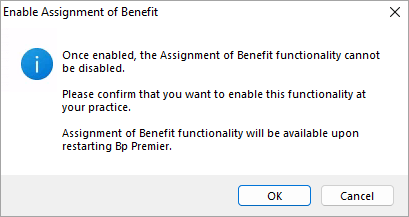
IMPORTANT Once enabled, the Assignment of Benefit functionality cannot be disabled.
Set Default Assignment of Benefit generation channel
To set the default assignment of benefit channel for your practice, follow the steps outlined below:
- From the main screen of Bp Premier, select Setup > Configuration.
- Select the Online Claiming tab from the left-hand panel.
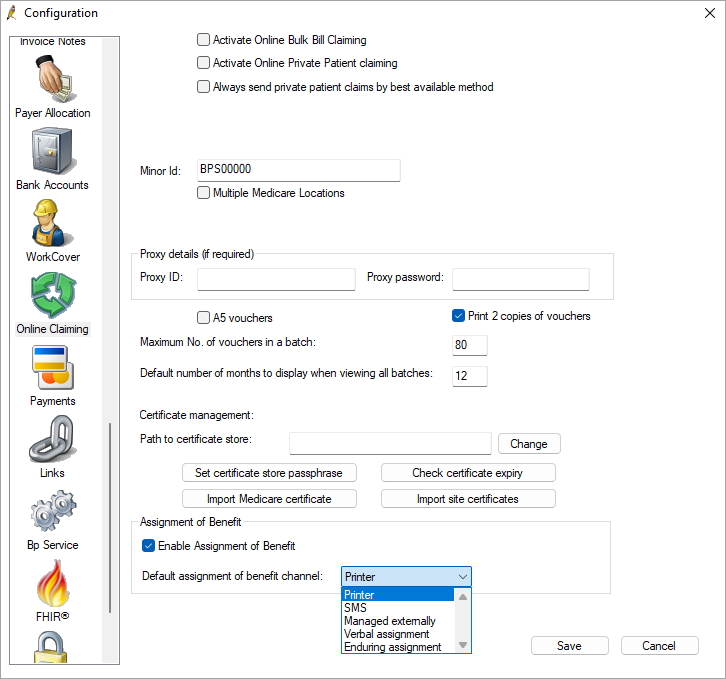
- In the Default Assignment of Benefit generation channel, select your practice's preferred method from the dropdown options.
- Click Save.
When generating an account for the patient, the selected default channel will be pre-selected and read from the patient demographics for the SMS number.
|
Option |
Description |
|---|---|
|
Printer |
Paper worfklow that has been modified to remain valid. |
|
SMS |
Utilise either the Pre or Post Assignment of Benefit Template, delivered via SMS with Bp Comms. |
|
Managed externally |
If BpComms is not used for SMS messaging, select this option to manage Assignment of Benefit requests outside of Bp Premier through an external SMS provider. The record of the completed assignment will be stored with the external third-party provider. Ensure the external third-party provider is supporting the generation and management of assignment of benefit request before using this option. For more information contact your third-party provider. |
|
Verbal assignment |
Verbal consent can be used when other options are unavailable until 30 June 2027. When creating an invoice the Assignment of Benefit will be set to Do not generate with Verbal assignment in the dropdown selection. See the Services Australia website for more information about verbal assignment of benefit for bulk billed services. |
|
Enduring assignment |
In the Patient details screen, use the checkbox for Enduring assignment of benefit to indicate that the patient has enduring assignment of benefit consent. This option is only available for MyMedicare registered patients, residents of aged care facilities and patients attending Aboriginal Community Controlled Health Organisations (ACCHOs). See the Australian Government Department of Health Disability and Ageing website for Enduring Assignment of Benefit form templates and the Services Australia website for more information about Enduring assignment of benefit. |
Enable appointment book status icons
The Appointment Book Assignment of Benefit (AoB) status icons in Bp Premier Oxford allow practice staff to view the progress of patient consent requests in real time. These visual indicators help users identify which patients are ready for billing and which still require follow up.
- From the main screen of Bp Premier, select Setup > Configuration.
- Select the Appointments tab from the left-hand panel.
- Enable Automatically show assignment of benefit form request status on appointment book.
- Click Save.
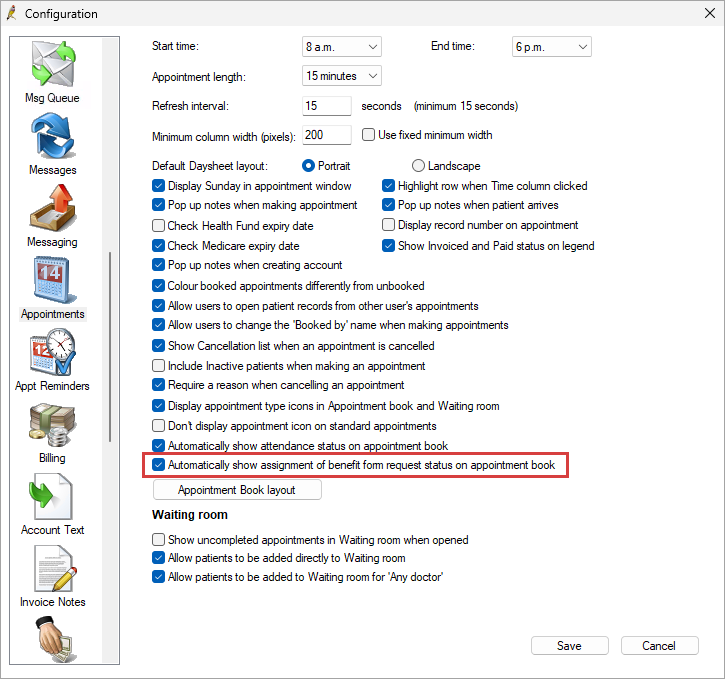
Assignment of benefit form request status icons will now display in the Appointment book.
|
Icon |
Meaning |
Description |
|---|---|---|
|
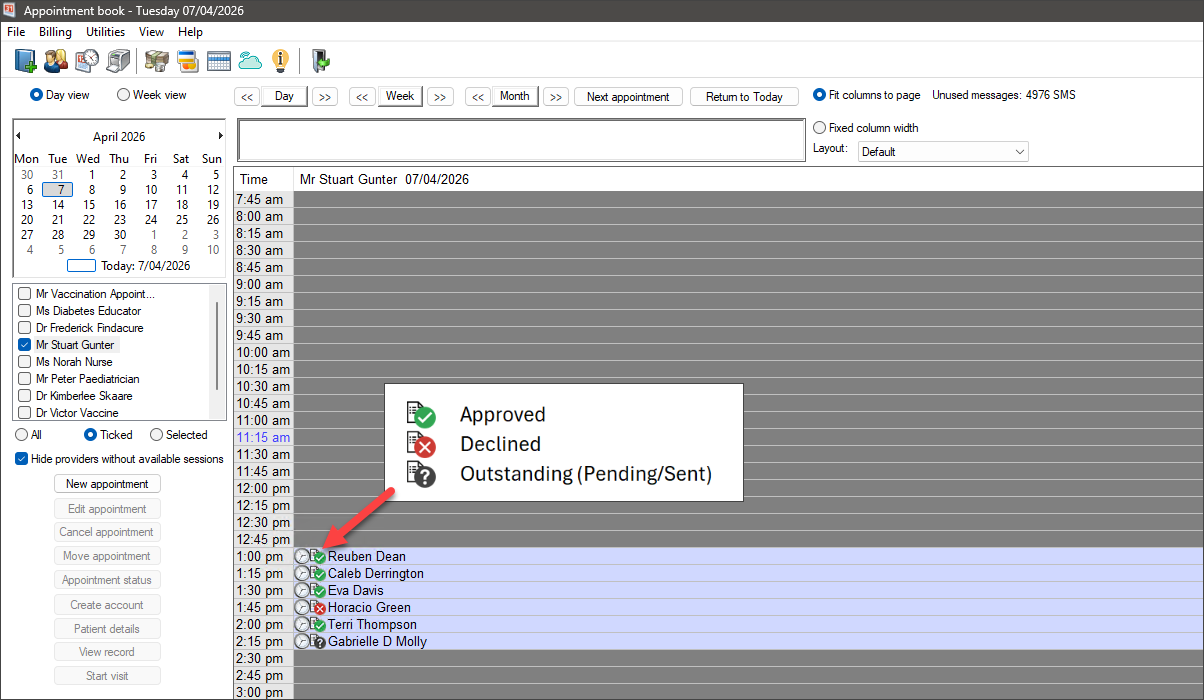
|
Outstanding (Pending/Sent) |
This icon appears as soon as an AoB form (pre or post assignment) has been generated, whether it is printed or sent electronically via SMS. It signifies that the practice is waiting for the patient to action the request. |
|
|
Approved |
This icon replaces the Outstanding icon once the patient (or a responsible person) approves the assignment of benefit via the digital web form, or the practice manually marks a printed form as approved. |
|
|
Declined |
This icon replaces the Outstanding icon if the patient refuses the request or if the practice manually records a printed form as declined. |


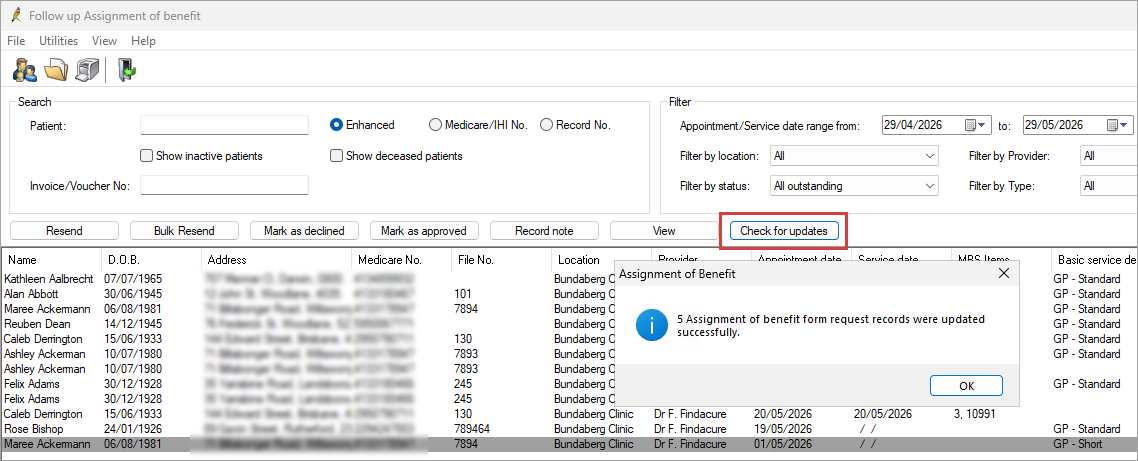
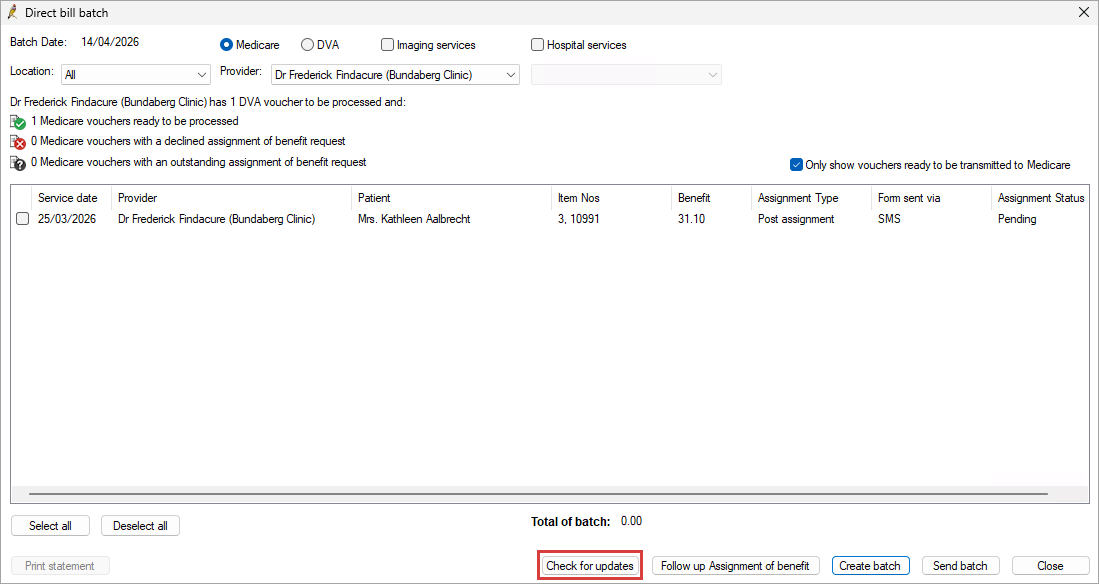
Appointment book AoB status icons are updated in two ways:
-
Automated background updates - Bp Service routinely checks for updates to outstanding AoB requests. This check occurs every 10 minutes by default.
-
Manual 'Check for updates' actions - Users can retrieve the most recent statuses at any time without waiting for the routine check. A manual update can be triggered in two areas:
-
In the Follow up assignment of benefit screen, selecting Check for updates refreshes the AoB status of all records displayed.
-
In the Online Claiming screen, when creating a new batch, clicking Check for updates ensures the most up-to-date AoB statuses are retrieved before claims are submitted.
Add Assignment of Benefit SMS templates
- From the main screen of Bp Premier, select Setup > Configuration.
- Select the tab for Templates on the left hand side panel.
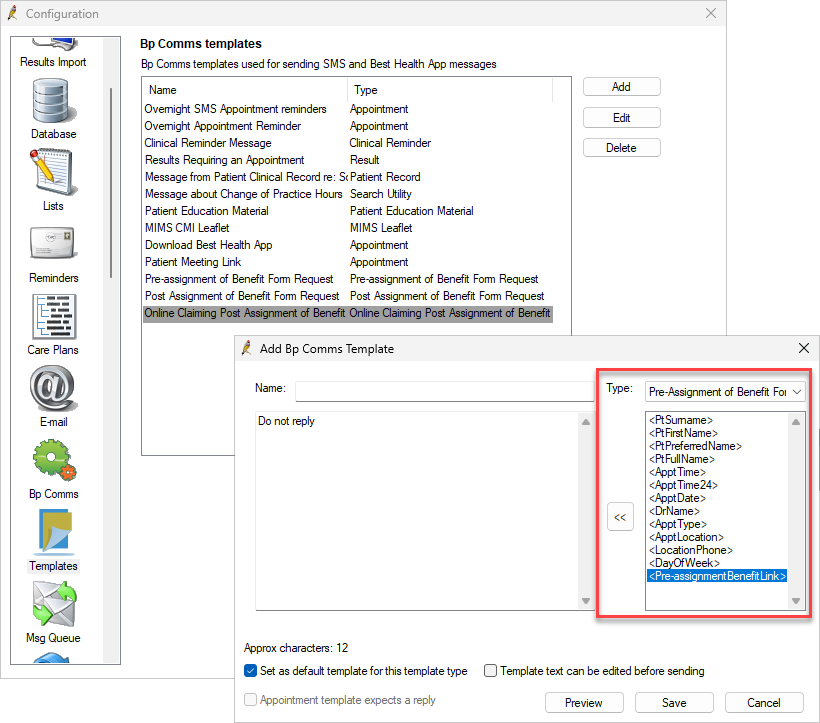
- From the Bp Comms templates list, select the Pre-Assignment of Benefit Form Request, Post Assignment of Benefit Form Request or the Online Claiming Post Assignment of Benefit Form, and select Add.
Edit or Add a new template
The default Assignment of Benefit templates may be edited to meet the needs of each practice.
Modify an existing template
- Go to Setup > Configuration.
- Select the tab for Templates on the left hand side panel.
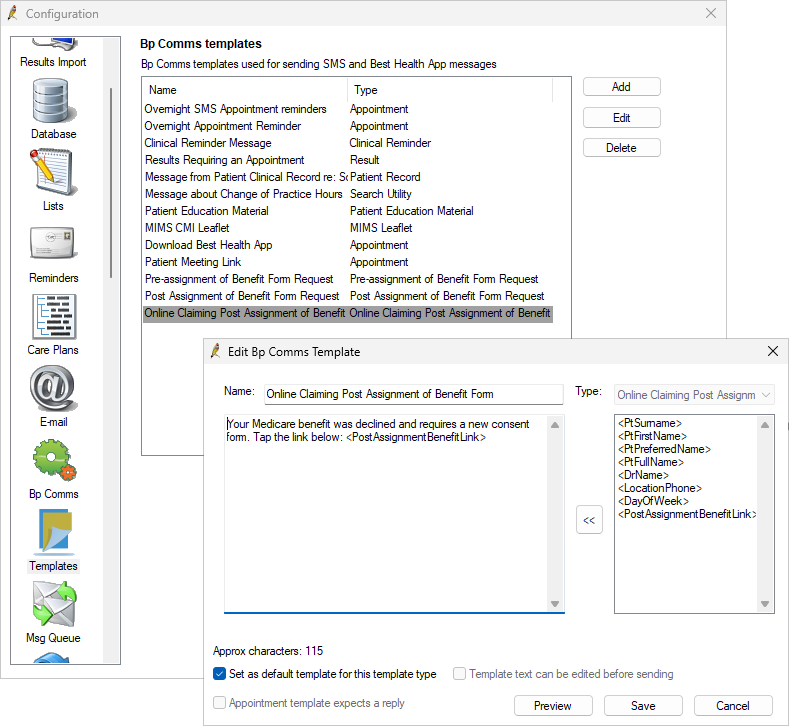
- Select the Pre-Assignment of Benefit Form Request, Post Assignment of Benefit Form Request or the Online Claiming Post Assignment of Benefit Form template.
- Click Edit.
- Apply the required changes and click Save.
Create a new template
- Go to Setup > Configuration.
- Select the tab for Templates on the left hand side panel.
- Select Add.
- Enter a Name for the template and choose the template Type of Pre-Assignment of Benefit Form Request, Post Assignment of Benefit Form Request or Online Claiming Post Assignment of Benefit Form.
- Add the necessary text and merge fields, then click Save.
NOTE The selected type determines which merge fields are available, including <PreAssignmentBenefitLink> and <PostAssignmentBenefitLink>, which generate a secure AoB consent link.
Important considerations
- When editing templates, practices should monitor the character count for each template type. Increasing the message length to extend beyond the SMS character limit for a single SMS will result in multiple messages sent and credits used, increasing the cost of each request sent.
- Pre-assignment of Benefit Form Request and Post assignment of Benefit Form Request SMS messages are sent from a branded sender ID and operate as one-way communications. Patients should not reply to these messages, as responses will not be received or actioned.
Set a Basic Service Description for Appointment types
When sending pre-assignment of benefit requests in bulk via the Send assignment of benefit form requests screen, only appointment types with a basic service description configured will be available to select.
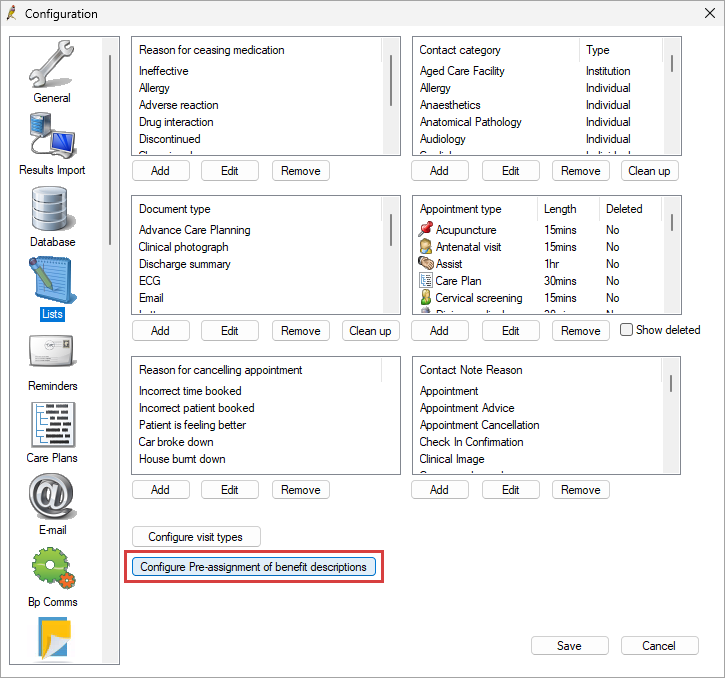
- From the main screen of Bp Premier, select Setup > Configuration.
- Select the Lists tab from the left-hand panel.
- Click Configure Pre-assignment of benefit descriptions.
- From the Configure basic service descriptions window, select an appointment type to edit and use the drop-down menu to choose one of the 16 Medicare service categories for the appointment type.
- Click Save.

Common BSD categories include:
- GP Short (Level A): Items up to 5 minutes.
- GP Standard (Level B): Attendance items between 6 and 20 (or 25) minutes.
- GP Long (Levels C, D, and E): Attendance items over 20 minutes.
- GP Care Planning and Health Assessments: Chronic condition management and health assessments.
Basic Service Descriptions for mixed billing clinics
For mixed‑billing practices, or for practices that do not intend to bulk bill every Standard Appointment type, it is recommended that custom Appointment Types be created.
- Go to Setup > Configuration > Lists.
- Click Add in the Appointment Type section.
- Create a new Appointment type with a description such as 'BB – Standard Appointment' or 'BB – Long Appt.'
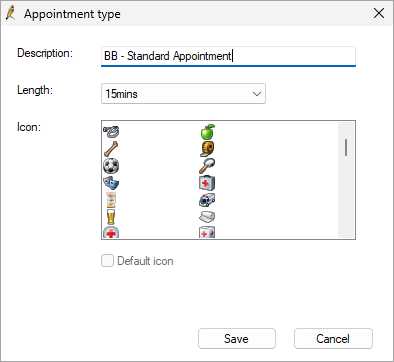
The Basic Service Description (BSDs) can then be mapped to these new Appointment Types, and bulk‑billing patients can be booked using these Appointment Types.
NOTE The default Standard and Long Appointment Types should remain unmapped. If these default Appointment Types are mapped to BSDs, they will be picked up by the filters in the Bulk Send Assignment for Benefit Request Form utility, and digital Pre Assignment of Benefit SMS messages may be sent to patients that the practice does not intend to bulk bill.
Last updated: 08 July 2026.


 AU
AU 